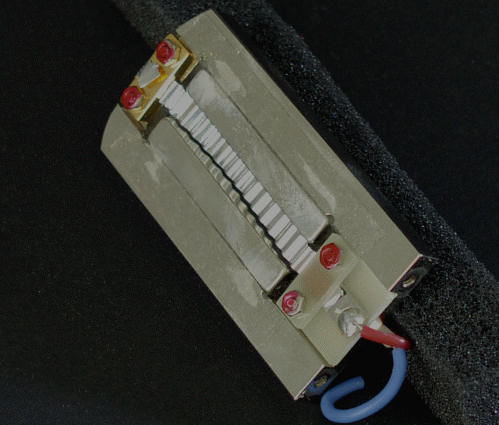
After my discussion of ribbon mic mods, Michael at OktavaMod sent me some pictures of sagging ribbons, something you might encounter while working on your mic.

Apex 205 mic with sagging ribbonSagging ribbon in RSM 4 microphoneSagging ribbon in RSM 3

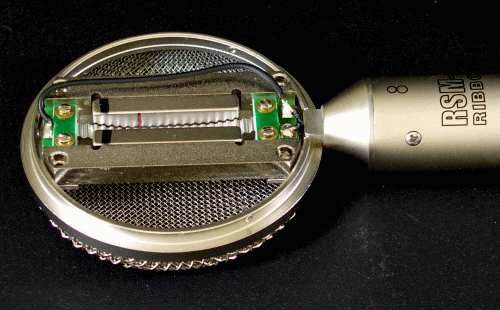
The most common symptoms of a loose ribbon are low output and decreased low-frequency response. With your mic open, it’s easy to see if the ribbon sags. But with sealed, un-modded mics, the protective mesh hides the ribbon. So If you suspect your ribbon needs tightening, but don’t want to disassemble the mic to check, Michael recommends a quick and dirty test: Connect the microphone to a mixer, and listen through headphones while rocking the mic back and forth. If the ribbon is slack, you’ll hear a clanging sound when the ribbon hits the magnet.

Ribbon repair

Repair is straightforward, though requires a delicate touch. Read the discussion, again thanks to Michael, on Gearslutz (and a similar TapeOp thread):

One or both of the ribbon clamps must be loosened and removed. Then the ribbon pried gently away from the lower clamp surface. Occasionally the ribbon is fused to the clamp surface and cannot be moved without tearing. In this case the last resort is to hope the other end of the ribbon can be freed from the clamp and pulled taught.

You might also need the previously-noted page about replacing the ribbon element in a ribbon microphone.

(And the easiest way, especially if you’re all thumbs: Have OktavaMod repair the mic for you.)

Tags: ,

StratI spend as much time as any guitar player tweaking knobs to find great tones. Here are some links that have helped me in the quest:

First, the effect of pickups on guitar tone:

Even though we each have different ideas about our ultimate tone, I think we’re all looking for a rich sound – rich in harmonics, that is. Lots of harmonic content = lots of ‘tone’. If you have lots of harmonic content to start with, you can easily use other sound shaping tools (tone controls on the amp, in particular) to sculpt your favourite and unique sound. It’s a bit like giving an artist every colour he could wish for to paint a picture. If you only give him a pencil, he can still draw a great picture if he’s really good, but has limited options.

The principles of rock guitar tone:

The best rock tone is from saturated power tubes directly driving a guitar speaker hard, with no load or attenuator getting in the way. The only really satisfactory way to get actual cranked tube amp and speaker tone with almost no room noise is to use a speaker isolation cabinet and its attendant gear.

Finally, the mother of all pages: Derek Miller’s collection of articles about guitar tone in rock’n’roll:

Perhaps the stereotype rock tone is that of the Marshall stack: a rectangular, 100-watt (or more), tube-powered amplifier “head” stacked on top of two speaker cabinets, each containing four 12-inch speakers. In this case, the guitar is a bit less important to the overall sound, although most who prefer it use Gibson-style solidbody guitars like the Les Paul or Gibson SG, with dual-coil “humbucking” pickups. Cranking up the Marshall creates a buzzing, distorted, complex, and extremely loud sound.

Tags: 

forehead slapInspired by “engineering screw-ups” on Gearslutz, here’s a list of recording and mixing bloopers that made it past the mixing room onto the final release.

These aren’t performance missteps, where the band missed a cue, or the singer came in too soon. There are certainly countless examples of those but most were included intentionally, to add character or realism. Rather, the flubs below highlight mistakes in recording or mixing that could have been corrected before the track was released.

Some of the mistakes probably went unnoticed. Some, I’m sure, were noticed and begrudgingly accepted because of a deadline. But reassuringly for us amateurs, they all prove that even the pros aren’t perfect. (more…)

Tags: , ,

David at Digital Audio Insider wrote an interesting article on using Last.fm Statistics to Quantify Audience Devotion. Audience devotion here refers to how many repeated listens a band’s tracks receive. Basically, do people keep listening to the band?:

I thought it’d be fun to use Last.fm statistics to try to devise a measure of “audience devotion.” Using the most popular act in the Last.fm database (The Beatles) as a comparison point, I looked up the total number of listeners and the total number of plays for 49 other acts. They include some of the biggest names in “indie” rock, some fairly unknown local acts, and a few various names from my iTunes library. I divided the number of plays for each artist by the total number of listeners to create a “plays-per-listener” ratio and then ranked the spreadsheet by that number.

As the article notes, it’s hard to game this number, so it should be a stable indicator of popularity. If your music is tracked through the last.fm database, this could be a good metric to track your own success.

Tangentially related, Coolfer has another analysis of trends in album sales, this time highlighting the continuing shift from an industry dominated by a few top sellers:

As the theory of the long tail would predict, the Top 200 accounts for a lower percent of total album sales today that it did three years ago. Between July 2004 and June 2007, that percent dropped about five points to about 35% from 40%.

There’s that long tail again…

Tags: , ,

I discussed a simple modification to an Apex 205 ribbon mic, and recorded samples to illustrate the change. Here are some concluding thoughts, and helpful resources for anyone planning to tweak a ribbon mic:

Should you do this mod?

Whether or not you should modify your own ribbon mic depends largely on your answers to 2 questions:

Can you hear a difference in the samples? If not, then you’re unlikely to gain any useful improvement to your recorded sound by modifying your mic.

Are you comfortable with a screwdriver and pliers? You can easily destroy the ribbon. If that prospect upsets you, then it’s probably best to leave your mic alone. (more…)

Tags: ,

It’s easy enough to play with mic placement on your guitar amp, but it’s not always practical, especially if you record by yourself. This video highlights the main miking positions, and how each affects the guitar’s tone.

Tags: ,

Apex 205Yesterday, I described a simple modification on the Apex 205 ribbon mic. To show the results of the mod, I recorded samples using both the modded 205 and a stock version of the same mic.

Methodology

I recorded each pair of clips below simultaneously, which makes A/B comparison easy: Line up the beginning of both clips in your DAW, and flip between them while they play. I choose this over a standard “before and after” approach because the performance in each pair of clips is identical, which makes it easier to concentrate on the sonic differences without being distracted by (more…)

Tags: , ,

Apex 205I have two Apex 205 microphones, the cheap Chinese ribbon mics appearing in amateur mic collections everywhere. Even out of the box, these microphones (and the equivalent mics from Nady, Thomann, SM Pro, et. al.) sound decent. But a DIY’er can easily make 2 changes to improve the sound:

  • Remove unnecessary screening from the mic
  • Replace the transformer

I recently performed the first modification on one of my mics, and left the other mic alone with the intent of doing a real A/B comparison. That is, with both mics on the same sound source, at the same time. Here, I’ll walk you through the mod, before discussing the changes I found in the (more…)

Tags: ,

Waves logoIn what FutureMusic dubs The Waves Ultimatum, Waves has been spying on studios to gather evidence against software thieves. Complete with hidden cameras. (There’s more on the campaign in this Gearslutz thread: Software Police on Patrol.)

Waves is targeting professionals, not home studios. That’s probably a good thing for the dozens of web forum posters I see every week ask “when would I use RenComp instead of RenEQ?” Generally, you know the answer to that question before shelling out $1,200 for the plugins.

However, if you absolutely must pirate a piece of software (“I need the SSL bundle so I don’t sound amateur …”) at least have the sense to buy it legally before making any money with it!

Tags: 

Mixing DeskWatch for “the wall”: Marathon runners hit a wall somewhere around the 20-mile mark. Mixing engineers experience something similar: After a point, mixes don’t get better, they just get different. Learning to recognize when you’ve reached this point is crucial to improving as a mix engineer. Unlike runners, however, engineers who hit the mixing wall should stop what they’re doing! Take a break. Or better yet, consider that the mix might actually be finished!

Try lowering the volume: Along with checking a mix through different speakers, it helps to listen for elements that jump out at different volume levels. In particular, spend some time with the mix turned way down. Thanks to equal loudness contours, our ears perceive bass frequencies differently at low volume, so mixing quieter can make it obvious when your bass levels are off. It also forces you to listen a little closer!

Skip the cheap reverb: If you have a choice between a low-quality reverb or no reverb at all, leave the track dry. When it’s not used as an obvious effect, we generally add reverb to restore a sense of natural space to close-miked tracks. However, cheap reverb sounds unnatural, and your listeners’ ears will sense this immediately. (Read more about why you should avoid cheap reverb.)

It’s easier to mix well-recorded tracks: Trite as it sounds, tracks that are recorded properly are easier to mix than tracks with problems. Any mix will only sound as good as the players, instruments, and equipment used to record it. If you’re having difficulty mixing a particular track, consider re-recording it …

Tags: , ,

« Previous Page« Previous Entries  Next Entries »Next Page »